

If you are wondering how long to pressure cook grain spawn jars for budget growing, you are really asking how to get sterile grain without wasting power, time, or jars. The decision is not just minutes on a dial. It depends on the species you want to grow, your batch size, your budget for equipment and energy, and your comfort with sterile work. A small oyster grow in a couple jars has very different needs from a large monotub run that needs many jars at once.
Budget growers often compare the cost of running a pressure canner for a long cycle against buying ready to use sterile grain. Both paths can work. We assessed available options based on sterility features, ease of use, and budget fit to help you weigh them. You can browse Sterilization and Pasteurization guides for background on clean technique while you read.
What Actually Matters
Jar Size, Grain Type and Hydration Level
Larger jars take longer for heat to reach the center, while small jars heat through more quickly. For that reason, growers commonly report using quart jars as a standard hobby size, with smaller jars heating a bit quicker and larger jars needing extra care. Grain choice matters too. Milo sorghum, rye, millet, and oats all absorb water differently, and wetter grain needs steady heat to sterilize fully without turning mushy.
You should judge hydration by look and feel rather than chasing a chart. Properly prepared grain should be plump, with no standing water and no cracked, burst kernels. If you see puddles at the bottom or many split grains, adjust your soak and simmer routine before you even think about timing. Dry spots can shelter contaminants, while overly wet grain invites bacterial souring after cooking.
Pressure Stability and Load Size
A full, stable pressure level matters more than the exact minute count. A cooker that holds steady heat will sterilize more reliably than one that spikes and drops. Growers commonly report running quart jars for around 90 minutes at full pressure once the cooker reaches steady steam, with smaller loads sometimes needing less time. Always follow the manufacturer own instructions for your specific unit, never leave it unattended while pressurized, and let the pressure release naturally before opening the lid.
Load size changes everything on a budget. A single layer with space for steam to circulate heats evenly, while a tightly packed cooker with stacked jars can create cool spots. You will save money by running full but not crowded loads, using jar racks or cloth to keep glass off the bottom, and keeping lids loose enough to vent. If your cooker is small, separate modest cycles often give cleaner results than one overloaded cycle.
To match cooker volume to your batch, see the presto pressure cooker for grain spawn overview for budget friendly sizing ideas. You want enough room for steam flow plus headspace in each jar. A cooker that fits your usual batch will cost less to run over time.
Budget Math: Energy, Time and Contamination Risk
Budget is not just the cooker price. It is electricity or gas, your time, lids and filters, and the cost of a failed batch. A long cycle uses more energy, but a short cycle that leaves survivors wastes the whole jar. You should weigh cycle length against failure rate. If you lose a noticeable share of batches to contamination, premade sterile grain often pencils out cheaper than repeated cooking.
Think about your weekly routine as well. Soaking, simmering, loading, heating, cooling, and cleaning can take an entire evening. If you value your time or only grow occasionally, that labor matters. On the other hand, if you run many jars each month and enjoy the process, spreading energy cost across a large load brings the per jar cost down and makes home sterilization attractive.
Sterility Features That Save Beginners
New growers often undervalue lids, filters, and injection ports. A good lid with a filter patch allows gas exchange while blocking airborne molds, and a self healing port lets you inoculate without opening the jar. Without those features, even a perfect cook can fail during cooling or inoculation. Look for lids that seal cleanly, filters that stay dry, and ports that reseal after a syringe.
Ease of inspection matters too. Clear jars or bags let you spot sour smells, cloudy moisture, or stalled growth early. Uniform hydration and clean grain surfaces help mycelium run quickly. If sterile technique feels stressful, prioritizing these usability features over raw cooker power will stretch your budget further by cutting losses.
To make these ideas concrete, here are a few options that show the range from cooking your own jars to buying sterile grain ready to inoculate. Use them to compare features rather than as a ranked list.
This article contains affiliate links. If you buy through one of our links, FungiPop may earn a commission at no extra cost to you. Commissions never influence which products we recommend or how we rank them. Read our Affiliate Disclosure for details.
Quick Picks at a Glance
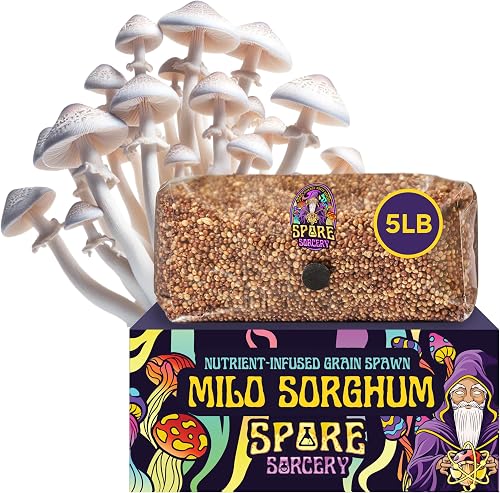
Prime Spore Sorcery 5 LB Sterilized Milo Sorghum Grain
As an Amazon Associate we earn from qualifying purchases. Product prices and availability are accurate as of the date/time indicated.
Pros
- Ready to use with no soaking, simmering or pressure cooking required
- Small Milo grains provide more inoculation points for rapid colonization
- Injection port and filter design supports cleaner sterile technique
- Works with multiple mushroom species and popular bulk grow methods
Cons
- Milo sorghum hydrates and shakes differently than rye, so beginners may face a learning curve
- Large 5 pound format takes longer to fully colonize than smaller grain bags
- Results can vary with inoculation technique, incubation conditions and storage
This 5 LB bag of sterilized Milo Sorghum grain spawn from Spore Sorcery is designed to take grain prep completely off your plate. It is aimed at beginners and hobby growers who want a clean start for monotubs, dubtubs or grain to grain transfers.
Milo sorghum offers many small grains per bag, which creates more contact points for mycelium to spread quickly. The added gypsum and proprietary nutrients are intended to support stronger growth and more productive flushes in bulk substrate.
Build quality is thoughtful for sterile cultivation, with a thick 3.0mil polypropylene bag, self-healing injection port and 0.2-micron filter for gas exchange. The vacuum-sealed packaging helps lock in uniform hydration and freshness until inoculation.
As with any living culture medium, success still depends on clean inoculation technique and proper incubation conditions. Some growers may also need time to adjust to Milo, since hydration and shake timing feel different compared to rye berries.
Overall, this is a convenient, beginner-friendly grain spawn option for growers who value speed and simplicity. If you want a large, ready to inoculate bag with solid sterile features, it is worth trying for your next grow.
Product: Sterilized Milo Sorghum Grain Spawn, 5 LB Bag, Classic Style.
Grain: Premium Milo Sorghum (Sorghum bicolor) enriched with gypsum and proprietary nutrients.
Packaging: 3.0mil polypropylene bag with self-healing injection port and 0.2-micron filter.
Compatibility: Monotubs, dubtubs, grain to grain transfers and bulk substrate for multiple species.
Matching Gear to Your Grow
If you grow oysters a few times per year in a small kitchen, skipping the cooker can be the budget move. The SPORE SORCERY 5 LB Sterilized Milo Sorghum Grain arrives sterilized and vacuum sealed in a 3.0mil polypropylene bag with a self healing injection port and a 0.2-micron filter for gas exchange. You avoid a long cook, cooling wait, and jar washing. It is enriched with gypsum and nutrients to support colonization, and it works for monotubs, grain to grain transfers, and bulk substrate.
A real downside is you cannot adjust moisture if the bag arrives too wet, and single use bags create more waste than reusable jars. The 5 LB bag size also limits flexibility if you only need a small amount for a trial. Still, for beginners who want to practice inoculation without cooker stress, that trade can be worth it.
If you already own a large canner and run many jars for monotubs or bulk substrate, learning proper timing pays off. You can soak milo or rye, load jars loosely with generous headspace for steam movement, and run the steady cycles growers commonly report for quart jars. Pair that routine with the presto pressure cooker for grain spawn overview to match cooker size to your batch. Your per jar cost drops with each full load, though you accept more prep and cleanup.
If you are moving between jars and spawn bags, think in terms of workflow. Jars are reusable and easy to shake, while sterile bags are single use but save washing and filter maintenance. Explore the Grow Bags, Spawn Bags and Liquid Culture collection to see how bag filters and ports compare. Choose jars when you inoculate often and want to reuse gear, and choose sterile bags when you want quick turnaround with less equipment.
Common Mistakes
Overfilling or underfilling jars. Overfilling blocks steam circulation and leaves a dense core that stays under sterilized, while underfilling wastes energy and dries grain during a long cycle. Leave generous headspace, keep lids fingertip tight rather than cranked down, and use foil covers to keep filter patches dry.
Rushing the cool down. Opening the cooker early or forcing a quick release can pull unfiltered air into jars and crack glass. Let the pressure release naturally before opening the lid, then move jars to a clean area without tightening lids until they are fully cool. Planning this waiting time into your evening prevents the most common contamination spike.
Inoculating warm grain or working in dusty air. Warm jars create condensation that invites bacteria, and open air inoculation lets molds settle on ports. Wait until jars feel room temperature, wipe ports with alcohol in a still air space, and review how bulk substrate handling affects clean spawn in the how to use substrate for oyster mushroom guide. Patience here protects the long cook you just completed.
Who Should Wait or Buy Differently
A pressure cooker routine is not ideal for growers without a stable stove setup, renters who cannot vent steam safely, or anyone who only runs a single small batch each season. If you lack storage for a bulky canner, dislike monitoring pressurized equipment, or want to confirm your process before investing, start with premade sterile grain or partner with a friend who already cans. You can always add a cooker later once your batch size and success rate justify the expense and counter space.
Frequently Asked Questions
How long should I cook grain spawn jars if I want to save energy?
Growers commonly report a steady cycle of around 90 minutes for standard quart jars of hydrated milo or rye once full pressure is reached, with smaller jars sometimes needing a bit less. You save more energy by running full, well spaced loads and letting the cooker heat and cool without rushing than by shaving a few minutes. Always match time to jar size and grain moisture rather than using one fixed number for every load.
Does grain type change the timing?
Yes, because dense grains and high moisture levels slow heat penetration. Milo sorghum with gypsum enrichment tends to stay loose and colonize evenly when hydration is uniform, while cracked or mushy grain can harbor wet spots that need a full, steady cycle. Whatever grain you use, aim for plump but separate kernels with no free water before cooking.
When is premade sterile grain a better budget choice?
Premade sterile grain is often smarter if you lack a large canner, grow infrequently, or lose many home cooked jars to contamination. A ready to use bag with a 0.2-micron filter and injection port removes prep, energy use, and cleanup while letting you focus on inoculation technique. Once you scale to frequent bulk grows, investing in your own cooker and reusable jars usually lowers cost per batch.


Write Your Review
No reviews yet. Be the first to share your experience!