

Figuring out how to cool sterilized jars before inoculation is one of those quiet skills that decides whether your grow starts clean or stalls on day one. You are deciding where to set hot jars down, how long to leave them alone, and how to keep them sterile while they come back to room temperature.
The right approach depends on your species being grown, your batch size, your budget, and your experience level. Oyster mycelium tolerates a bit more handling than a sensitive gourmet culture, a small batch of jars cools differently than a full canner load, and beginners benefit from a simpler, more forgiving routine. Our Sterilization and Pasteurization guides walk through the full sterile workflow around this cooling step.
What Actually Matters
Where You Cool Matters More Than What You Buy
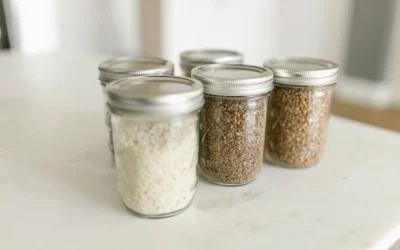
You want a clean, still, draft free spot where jars can sit undisturbed until they feel neutral to the touch. A freshly wiped counter in a closed room, inside a still air box area, or on a wire rack away from foot traffic works well for most home growers. Avoid windowsills, vents, fans, and exterior doors because moving air brings dust and mold spores right to your lids and filter patches.
Do not move hot jars to a cold garage floor, stone countertop, or refrigerator to speed things up. Rapid chilling can stress glass, pull in unfiltered air as pressure shifts, and create heavy condensation inside the jar. When you sterilize grain, always follow the manufacturer’s own instructions for their specific unit, never leave it unattended while pressurized, and let the pressure release naturally before opening the lid.
Jar Material, Fill Level, and Heat Retention
Glass holds heat for a surprisingly long time, especially when grain is moist and packed in the center. Growers commonly report that a full load can stay warm to the touch for many hours after the canner itself feels safe to open, while a small batch cools noticeably sooner. If you are choosing jars, look for consistent wall thickness, intact lids, and filter discs or ports that stay seated during heating and cooling.
Fill level changes cooling behavior too. Underfilling or overfilling the jars creates uneven moisture and hot pockets that linger in the middle, which is a common reason for slow colonization or sour spots. Leave even headspace, shake only when the jar is fully cool if your recipe calls for it, and keep foil or lids in place so cooling jars do not breathe in room air. See our Presto pressure canner guide for how load size affects heat up and cool down.
Timing the Inoculation Window
You should inoculate only when the grain feels completely neutral, with no warmth on the sides, bottom, or core. Growers commonly report waiting overnight after sterilization before inoculating, which gives the center time to equalize and lets you work when you are rested and focused. If you are unsure, wait longer rather than rushing, because heat that you can barely feel on glass can still harm spores and liquid culture.
Plan your day so cooling fits your sterile work time. Many growers sterilize in the evening and inoculate the next morning in a clean space with gloves, mask, and wiped surfaces. For context on equipment timing and first grow planning, our Presto 23-Quart vs Instant Pot comparison for first grows explains why a full pressure cycle plus natural release plus bench cooling takes the better part of a day.
Keeping Things Sterile While You Wait
Cooling is a vulnerable period because jars create a slight vacuum as they contract and can draw air around loose lids. Keep foil caps, filter patches, and injection ports closed and do not loosen bands to peek or sniff. Set jars upright with space between them for even airflow, avoid stacking, and do not shake or tilt until you are ready for inoculation.
Wipe your work area and allow it to settle before you handle cool jars, and use gentle, deliberate movements to avoid kicking up dust. If you wipe ports or tools with alcohol during setup, remember that isopropyl alcohol is flammable and should be kept away from any open flame, in a well-ventilated area. Our budget grain spawn cooker picks also cover simple habits that help keep jars clean from cooker to bench in 2026.
To illustrate controlled cooling concepts, here are a few options that show the range from slow rate containers to bench stable gel coolers. They are lab tools for tiny vials and reagents, not quart jars, but they help explain the ideas:
This article contains affiliate links. If you buy through one of our links, FungiPop may earn a commission at no extra cost to you. Commissions never influence which products we recommend or how we rank them. Read our Affiliate Disclosure for details.
Quick Picks at a Glance

Prime ULAB UCP1004 Cryo-Safe Freezing Container 2-Pack

Prime Globe Scientific 454030 Quick Freeze Mini Cooler
As an Amazon Associate we earn from qualifying purchases. Product prices and availability are accurate as of the date/time indicated.
Pros
- Accurate minus 1C per minute cooling for reliable cryopreservation results
- Includes two 18-place containers for greater throughput and value
- Fits three common tube sizes: 1.0ml, 1.8ml and 2.0ml
- Tough PC jar and HDPE lid stand up to repeated minus 80C cycles
- No batteries, cables or software needed for operation
Cons
- Requires 100 percent isopropyl alcohol, sold separately and needs periodic replacement
- No temperature indicator to confirm cooling rate during use
- 18-tube capacity per unit may be small for high-volume labs
The ULAB UCP1004 is a two-pack of alcohol-based cryo freezing containers designed to deliver a controlled minus 1C per minute cooling rate. Each unit holds 18 cryogenic tubes in 1.0ml, 1.8ml and 2.0ml sizes. It is made for cell culture, academic and biotech labs that need simple, repeatable cryopreservation.
In use, you fill the inner chamber with 100 percent isopropyl alcohol, load your vials, then place the sealed jar in a minus 80C freezer. The alcohol and foam insert buffer the temperature drop to protect cells from lethal intracellular freezing. This passive method is proven, consistent and requires no power or programming.
Build quality is lab ready with a clear polycarbonate jar, high-density polyethylene closure and fitted tube holder with foam insert. The compact 4.61 inch by 3.39 inch footprint keeps vials upright and saves freezer space. Materials feel sturdy and are built to handle repeated cold cycles and alcohol exposure.
The main tradeoffs are maintenance and monitoring. You must supply and replace the isopropyl alcohol yourself, and there is no built-in thermometer to verify the rate. With 18 places per container, larger labs processing dozens of vials at once may need multiple sets.
Overall, the ULAB 2-pack offers dependable, low cost cryopreservation without complexity. It is easy to use, reusable and ideal for small to mid-size labs. If you want consistent minus 1C cooling for common cryo tubes, this is a practical choice.
Model: ULAB UCP1004, 2-pack freezing containers
Capacity: 18 places per container for 1.0ml, 1.8ml and 2.0ml cryo tubes
Cooling Rate: minus 1C per minute in a minus 80C freezer with 100 percent isopropyl alcohol
Materials: Polycarbonate jar, HDPE closure and tube holder with foam insert
Dimensions: 4.61W x 3.39H inches, compact PC style design
Fill the inner compartment with 100 percent isopropyl alcohol before each run and do not overfill. Insert up to 18 sealed cryo tubes into the holder and secure the HDPE closure.
Place the upright container directly into a minus 80C mechanical freezer overnight for gradual cooling. Transfer vials to long term storage after the cycle and replace alcohol per lab protocol.
Pros
- Consistent up to one hour benchtop cooling for small batch workflows
- Durable polycarbonate construction with contained non-toxic gel
- Gel-filled lid improves thermal stability compared to basic coolers
- Printed grid lid and non-skid feet improve organization and safety
Cons
- Requires 24 hour pre-freeze at minus 20C to minus 25C, so advance planning is essential
- 12-place capacity and one hour hold time will not suit large or extended procedures
- Specialized lab design offers limited use outside controlled sample handling
The Globe Scientific 454030 Mini Cooler is a 12-place Quick Freeze benchtop cooler built for labs handling reagents, enzymes and other temperature sensitive samples. It is ideal for technicians, researchers and educators who need short term cooling without the mess of an ice bucket.
In use, it keeps samples cool on the bench for up to one hour after a full freeze, which suits most staining, PCR setup and enzyme workflows. The gel filled lid and base help maintain a consistent temperature and buffer against fluctuations when moving between freezer and bench.
Build quality is a clear strength, with a tough polycarbonate shell containing a non-toxic insulating gel. The keyed lid locks in place easily and includes a printed grid for quick sample identification, while non-skid feet keep it steady on smooth lab surfaces.
The main tradeoff is planning, since it needs 24 hours at minus 20C to minus 25C before use to reach full performance. The 12-place format and one hour hold time also mean it is best for small batches rather than high throughput or all day storage.
Overall, this is a practical, durable alternative to ice for controlled benchtop cooling. If you need reliable short term protection for sensitive reagents in a compact footprint, the 454030 is a smart bench accessory.
Model: Globe Scientific 454030, 12-Place Quick Freeze Mini Cooler for lab benchtop use.
Cooling Performance: Up to 1 hour benchtop cooling after 24 hour freeze at minus 20C to minus 25C.
Construction: Tough polycarbonate shell with non-toxic gel, gel filled lid for added stability.
Dimensions: 7.13 x 7 x 5.5 inches, Weight: 1.75 pounds, compact footprint for crowded benches.
Features: Keyed lid with printed grid for sample ID, non-skid feet for secure placement.
Matching Gear to Your Grow
Your cooling setup does not need to be fancy, but it should match how many jars you run and how clean your space is. Think in scenarios rather than shopping for a jar chiller, because no small cooler can safely chill a hot quart of grain.
If you run a small batch for oysters or cubes in a home kitchen, focus on patience and placement. Leave space between jars on a towel lined rack in a closed room, keep lids and foil on, and inoculate the next day when glass feels neutral. Concepts from ULAB 2 Pcs Cryo-Safe -1℃(-33.8℉) are useful here because that system is built around a steady cooling rate of approximately minus one degree per minute with isopropyl alcohol in the chamber, which reminds you that slow and even beats fast and uneven every time.
If you also do agar, liquid culture, or enzyme style bench work, bench stability matters as much as cool down. GLOBE SCIENTIFIC 454030 Mini Cooler, Quick Freeze is a 12-Place gel filled cooler that keeps temperature sensitive items cool on the bench for up to one hour after being frozen for 24 hours at minus 20 to minus 25 degrees, with a tough polycarbonate shell and gel filled lid for extra stability. You would not put grain jars inside it, but it shows what to look for in a holding step: insulation, lid coverage, and protection from temperature swings while you work.
If you run larger batches or share a kitchen, give yourself a dedicated cooling zone. A low shelf in a clean closet, a sanitized tote left cracked for gentle air exchange, or a still air box turned on its side as a dust shield can work. Space jars apart, label them, and resist handling them until inoculation time so you do not transfer skin oils or dust to ports.
Common Mistakes
• Inoculating while jars still feel warm. Even faint warmth in the core can weaken spores and liquid culture and encourage bacterial growth. Wait until the jar feels neutral top to bottom, and growers commonly report better results when they give a full overnight rest rather than checking every hour.
• Forcing a fast chill or opening the cooker early. Moving hot jars to a cold surface or fridge, or not letting pressure release naturally, can cause boil over, cracked glass, sucked in lids, and condensation that invites contamination. Let pressure drop on its own, crack the lid only when safe per your manual, then move jars gently with mitts to their cooling spot.
• Fiddling with lids, foil, or filter patches during cool down. Underfilling or overfilling the jars already stresses moisture balance, and lifting covers to check smell or shake early only adds exposure. Keep everything sealed, keep hands off, and do your shaking, sniff check, and inoculation in one clean session when jars are fully cool.
Who Should Wait or Buy Differently
If you only need to cool quart grain jars on the counter, a lab vial cooler is not ideal for your task and not a good fit for bulk sterilization workflow. Those 18 place and 12-Place coolers are designed around 1.0, 1.8 and 2.0ml cryogenic tubes or small reagents held in foam or gel, with requirements like placement in a minus 80 degree mechanical freezer, so they cannot absorb heat from large jars. You are better served by improving your clean cooling area, upgrading lids and filters, and saving your budget for a reliable canner, quality grain, and sterile transfer tools.
Frequently Asked Questions
How do I know sterilized jars are cool enough to inoculate?
Hold the jar with clean hands on the sides and bottom and check for any warmth at all. It should feel neutral like room temperature glass, with no warm core and no fresh condensation blooming under the lid. When in doubt, wait a few more hours and check again in your clean work area.
Can I put hot sterilized jars in the fridge or freezer?
You should not, because rapid chilling can stress glass and pull unfiltered air past lids as contents contract. It also creates excess moisture inside the jar that favors bacteria. Cool gradually in a clean, still room with space between jars instead.
Should lids stay on while jars cool?
Yes, keep foil, lids, filter patches, and injection ports in place for the entire cool down. Jars naturally draw a slight vacuum as they cool, so any gap becomes an entry point for contaminants. Open or adjust lids only during inoculation with washed hands, gloves, and a freshly prepared sterile field.
Write Your Review
No reviews yet. Be the first to share your experience!